Вт, 16 авг 2016 Автор: Павел Якименко
In the summer, vacations and trips to the cottage of many vacationers
attracted by the idea of creating a hammock on the plot.
In fact, lightweight design, easy to manufacture,
able to give a relaxing outdoor recreation in the shade of a tree.
Here will be described how to make a hammock for the garden, with a description
every step.
You will need a small amount of material, tools, and
Of course the desire to spend time.

Contents
Preparation for work
How to make a hammock with your own hands? First you need
to choose the right place where our construction will be installed.
It should be in the shade, and not interfere with the passage through the dacha
plot. Hammock can be suspended between two specially
installed pillars, which for this must be
dug into the ground for at least 1 meter. You can also hang hammock
between two trees growing nearby. In this case, the crown
trees provide natural shelter from the sun. Pay
attention to the thickness of the trunks, which must be at least 20
cm, and the distance between them – from 2.7 to 3 meters. If you change
the distance between the supports is impossible, the length of the hammock is adjusted with
using stronger deflection or hanging height.
It should also choose the right material used
for making a hammock. Synthetic materials possess
durable but uncomfortable in everyday use
natural body ventilation in such a hammock will be almost
absent. Therefore, preference is given to canvas or
camouflage fabric, mattress tic or canvas. Similarly with
strengthening the hammock, cotton ropes are perfect, with
which is easier to work with in the course of tying knots and hanging
hammock.

The important point is the safety of the use of a hammock, because
its design is experiencing significant stress as well as impact
atmospheric conditions (rain, damp, etc.). Of course,
the intensity of use of all users will be different. But,
regardless of the quality of the materials used, the hammock does not serve
more than two years, after which it is recommended to change it in order to
avoid falling and related injuries.
The hammock is usually hung at a comfortable height of 1.5-1.6 m. If
for this purpose trees are selected, then in the place of hanging a hammock to them
nail the special bars-clamps that do not allow fastening
hammock crawling down the trunk. Also in the place where the rope will be
to come into contact with the tree, it may be accelerated
frayed. To avoid this, put a capron on her
the tube. Before you determine the height of the hammock,
think about who will use it. If you rest in a hammock
there will be older people, or children, hang it lower. So you
make it easier to use and avoid injury.
There is also a more complicated option, how to make a hammock
using hands, while using a portable suspension structure,
wooden or metal. This suspension can be freely
move around the site, seeking the most comfortable
location.

Making a hammock, step by step
Although there are several different options
making a hammock do it yourself, they all use the same basic
principle, differing only in minor details. To build
such a basic construction, resembling a tissue cocoon, we and
let’s get started
It will take a reliable cord, about 20 meters long capable
carry a load of about 150 kg for hanging and securing
hammock, and two pieces of solid matter, with dimensions of 1.5 to 3 m.
Pieces of fabric overlap, and, from the narrow side,
прострачиваются по двум параллельным краям, навстречу друг
to a friend, so that peculiar pipes with no
stitched edges. A soft mat should be placed inside the product.
from a synthetic winterizer which will make a hammock more convenient. After that two
wide edges are also sewn up.
Into the pipes formed from the narrow edges of the hammock, insert
cord, for which the hammock will be hung later. Cord
intersects and binds so that the fabric is gathered. Same
cord tie the place where the fabric gathered. Now it only remains
hang hammock in cooked place. To get into this
hammock, will require a certain dexterity of the body. In the meantime, you
do not fall out of the hammock cocoon, due to the peculiarities of its design,
and rest in it perfectly relaxes the muscles.
In the following version of the hammock do it yourself,
additionally using two wooden planks, reinforced with narrow
sides of the fabric base. They do not allow hammock
curl, forming a “cocoon”. He is deprived of the lack of “cocoon”
requiring some kind of acrobatic exercise to
climb into it. Hammock with trims at the edges is simpler
operation, and therefore perfect for kids, and individuals
old age.

How to make a hammock with your hands on the weaving technique
Несколько более сложный в изготовлении вариант hammock. For him
you will need: two wooden (or metal) strips, in
which every 5 cm. drilled large holes
what is the thickness of the cord, and the cord for linen (cotton rope),
not less than 8 mm thick. Cord length is calculated as: multiply
hammock length by 3, and multiplied by the number of holes in the slats. TO
the resulting number should be added approximately 20 meters for
mounts.
When drilling holes in the slats, smooth their edges.
Because of this, the rope used to secure the hammock and its
suspension will be less frayed, which will provide greater
долговечность hammock.

The rope is cut into pieces with a length of 6 meters. This should
stay 20 meters of rope for use as
fasteners.
Strengthen every 6 meter rope on the plank, using knots and
loops.
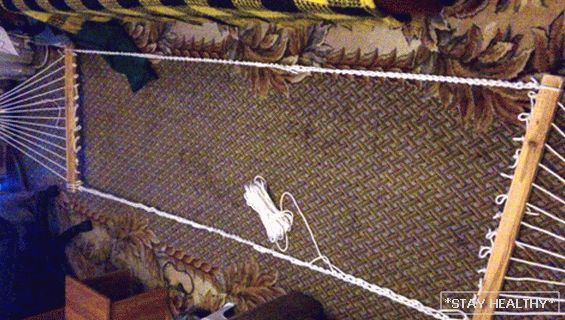
A grid is created with cells about 5-8 cm in size. Such cells
prevent them from tangling and / or falling through. TOогда сетка
hammock will be ready, its tails cords should be attached to the slats.
Also fasteners are attached to the slats, with the help of which the hammock will be
hung on supports. After that, it remains only to hang the hammock on
pre-prepared pillars or trees.