 Сб, 28 янв 2017 Автор: Марина Ивасюк
Any event in kindergarten or school is accompanied by
costume concert of children for their parents. Work on
creating an image falls on the shoulders of parents. No worries,
in fact, all the costumes can be made independently by your
by hands.
Today’s master class is dedicated to the story of
how to sew a gnome suit for a boy with your own
by hands.
Contents
Костюм гнома для мальчика своими by hands: кофточка или
vest
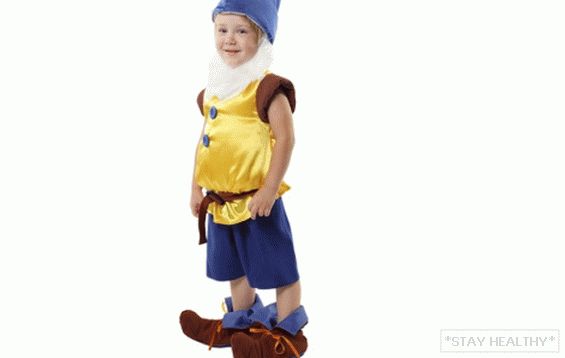
In order to look like a gnome, you need to be dressed as a gnome.
The main attributes when creating a gnome costume for a boy are
by hands являются: колпак, кофта или vest, штаны или шорты и
shoes. You can also add an image with leggings, if you wear shorts,
beard and wide belt on the jacket.
Decide on the color scheme of the entire costume. If the jacket is
match color with pants, then the cap should be different
colors, and if the jacket doesn’t match in color with the pants,
cap must be combined with pants necessarily. Nice to see
not only on the costume, but also to note the taste preferences of who
chose and completed the fabric of the whole image as a whole.
In order to sew a sweater, you will need one or two fabrics
colors, thread, measuring tape, big buttons.
Stage 1
Take measurements for the child and transfer them to the fabric here for this
patterns
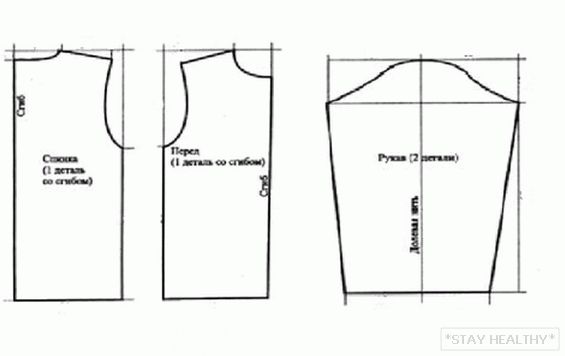
If you find it difficult and you are confused with measurements, you can do
simpler: put a cloth on the table from which you will sew a blouse and
Attach to it any purchase of your child’s jacket, which he
just in size. Circle the outline of it, that’s it.
patterns
You can mentally divide the jacket into sleeves, front and back
body parts. Do not forget that with this method, for every detail
you need to cut the already folded fabric, or if the parts are from
single layer of fabric, in its mirror image.
Stage 2
If you want to see on a child not a jacket, but a vest, then not
Sew on sleeves. The scheme for the body remains the same. Details
sewn together from the inside. Cut edges are machined on
overlock, then tuck in one or two layers and
stitched.
Stage 3
For decoration, you can sew a visor on the shoulder of the vest of another
colors. To do this, take the desired fabric, cut out of it
a rectangle measuring 10 × 15 cm. and fold in half. Sew it to
the inside of the fabric with the cut edge so that the folded edge
left hanging over the child’s shoulder. Hide all edges in the seam, so
what would not be visible cuts.
Stage 4
Sew big buttons on the chest. On the belly tie
belt.
Костюм гнома для мальчика своими by hands: шорты или штаны
Now sew pants or shorts. If you want to sew shorts, then
The costume can be complemented with striped golfs – leggings.
Stage 1
Measure the baby’s belt and the height of the leg from the hip to the bottom and from the groin
to the bottom. Divide the belt circumference in half, as the fabric will
cut and staple folded.
Stage 2
Fold the fabric in four layers and transfer dimensions to the drawing.
Make a pattern here according to this scheme.
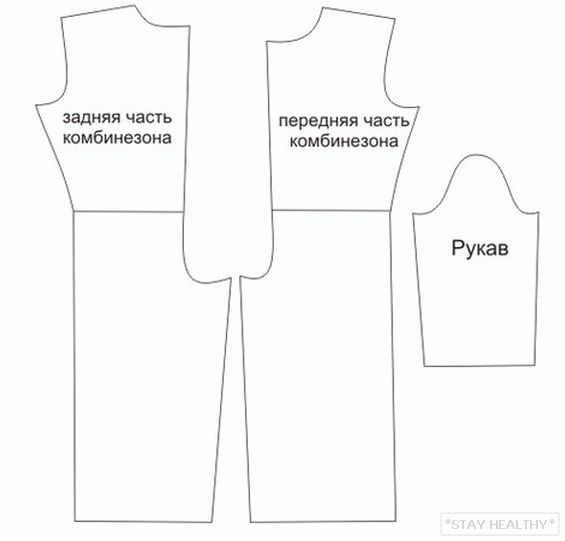
The diagram shows that the pattern is applied to the fabric folded in 4
layer. Then you have two details. Sew them together by
side upper seams. Next, twist the product so that the seams
held in the middle, and two parts lay on the sides folded
twice.
Stage 3
Sew long sections in half-folded parts between
by myself. This will be the seam between the legs.
Stage 4
Tighten and stitch the remaining cuts on the belt and legs. AT
tucked fabric can be stitched or inserted into the gum, which
will keep his pants on his belt and ankle-deep. If the leg
will be much wider than the legs, then the gum, pulling the lower part, will emphasize
the pomp of the suit.
If you decide to sew shorts, they are made in the same way,
only shorter in leg length.
Костюм гнома для мальчика своими by hands: колпак
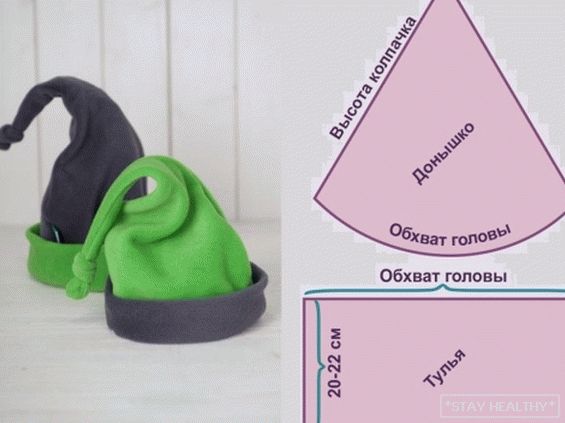
ATот такой колпак сделать очень просто. ATам понадобятся всего две
Details: a cone with a rounded bottom and a rectangle. Width
rectangle 20-22 cm, length equal to the length of the girth of the head.
Stage 1
Measure the circumference of the head with a tape.
Transfer the resulting dimensions to the fabric. Length or height of the cap
you choose yourself at your discretion. If you make it very long,
then the tip can be tied in a knot, as shown in
picture.
Stage 2
ATырежьте и сшейте получившиеся детали между by myself. Thule for
колпака может быть разной формы и colors. The contrasting crown is beautiful
Looks and emphasizes a headdress.
One of the decoration options can be made on it.
cloves. AT таком случае пришейте ее с одного ровного края, а другой
turn out.
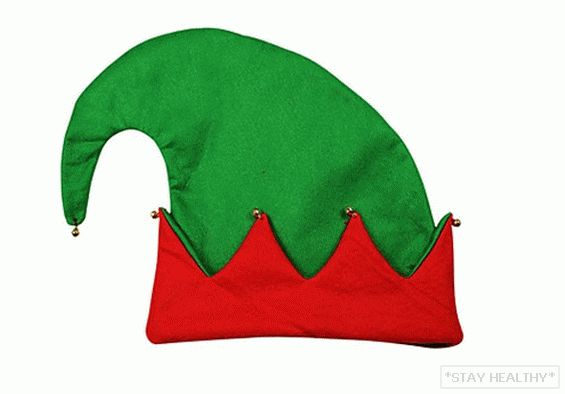
It can also be made double-layered, which will give it
extra stiffness.
Костюм гнома для мальчика своими by hands: башмаки
Shoes are also an important attribute in a suit. Dwarf will not
fabulous or incomplete without beautiful shoes with curved
noses and bells on the end. There are several ways to do this.
on the pattern.
Boots will need colored felt or thick fabric and thick
strong thread. You can use several colors of fabric and make
the sole of one color, and the edges of another. You can also do
shoes in one color inside and another outside. When you put them on
legs and twist the edges, it will be interesting to look.
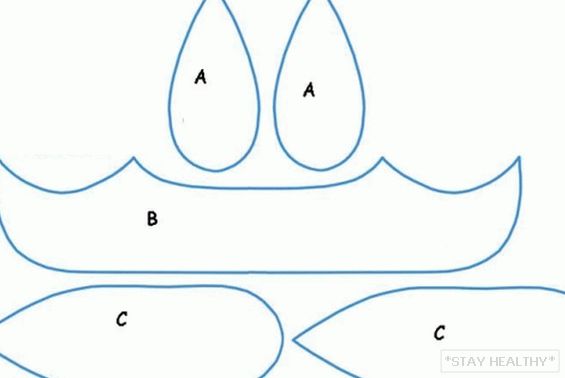
ATариант 1
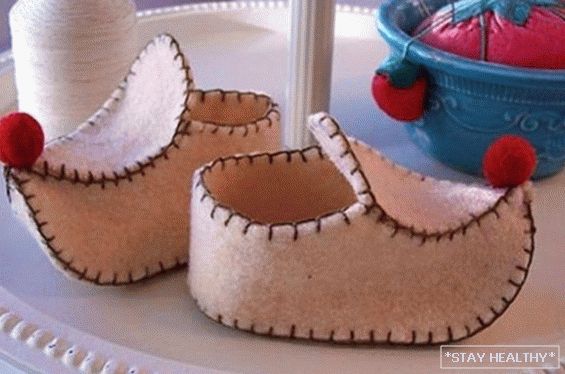
For this type of shoe you will need to make the following pattern and
cut out the details.
Stage 1
Be sure to measure the length of the baby’s feet and the height of the lift from
ankle heels and transfer dimensions to fabric. This is important because
if the baby is not comfortable in this shoe, then the joy of
holiday he will not feel.
Stage 2
Apply to the fabric pattern on the pattern, which is shown above.
ATырежьте и сшейте получившиеся детали между by myself. Detail A on
the figure is the upper part of the boot, and detail C is the lower part
or outsole.
If you want, you can stitch details with the help of sewing
машинки, а можно сшить и by hands. As a rule, the work is done
manually looped seam, because it does not require much time and
forces.
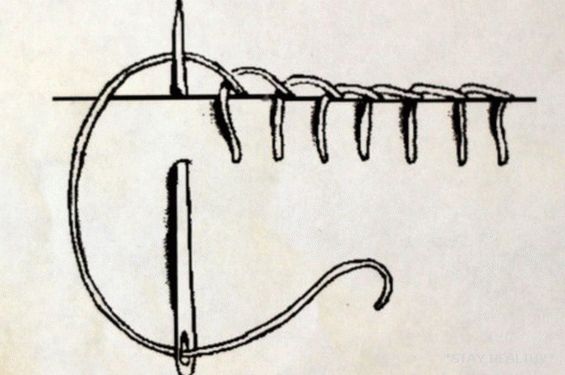
The loop stitch looks like this and is sewn by hand with
ordinary needle and thread. They cut the edges of the fabric or
paper.
Stage 3
Decorate the shoes with bells or boomones, which are sewn
on the sharp ends of the noses. You can also sew a satin bow
ribbons on the boot tongue.
ATариант 2
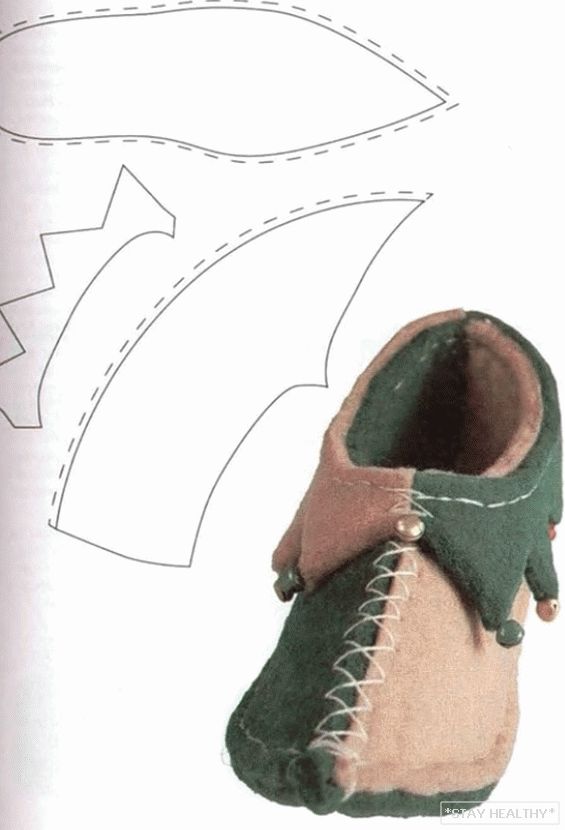
This image shows the pattern and the final result.
You can, as with the first option, use several
colors and types of fabrics.
Stage 1
Measure the size of the foot and the height of the baby’s feet.
Stage 2
Draw on the fabric details of the measurements and cut. Sew them between
by hand or with a sewing machine. Decorate with bumbons,
bells and bows optional.