Good afternoon, my dear mothers. Today we will be with you to do a bodice for a children’s dress. The bodice is the upper part of the detachable dress – that is, such a dress where the hem it is covered separately, the bodice is separate and then the bodice is sewn with a hem. we create with you one single bodice pattern – and then, on the basis of it, we sew a lot of children’s dresses with detachable bodice.
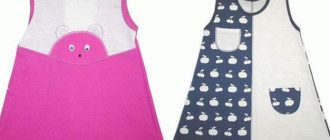
You may be surprised by my statement that based on You can sew several dresses on one bodice pattern. Now below you will see evidence of my words in the form of photographs. BUT at the same time we’ll look at the same photographs as there are bodices on children’s dresses:
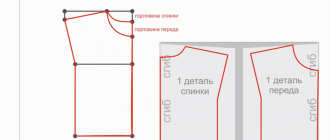
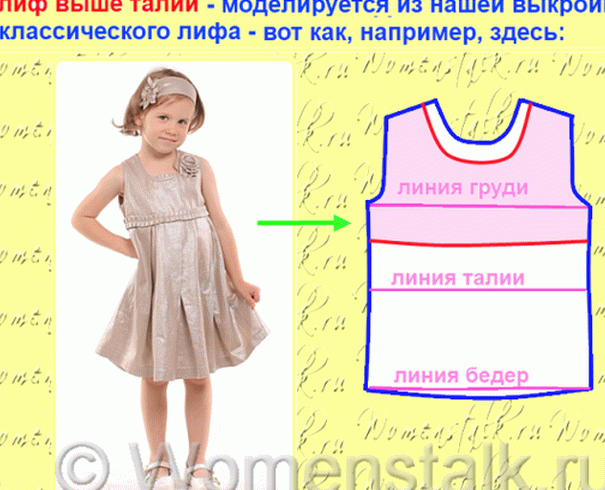
The bodice is higher than the waist. We will get his pattern, if we take the classical pattern of the bodice (we will be in this article learn to draw) and crop it at a level above the waistline.
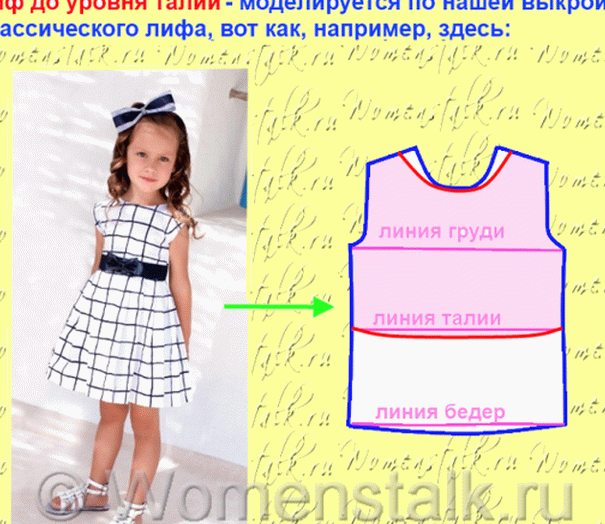
Most often we meet the bodice along the waistline – he also modeled from a classical bodice pattern, like this:
Yes, the bodice is most often found above the waistline or to the line waist. But we are not in vain today we will draw a bodice pattern reaching right up to the hips because there are dresses with bodice below the waistline:

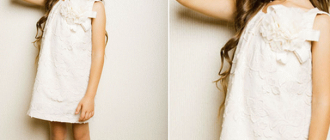
And also there are dresses where the hem begins only at the hips line, that is, the top of the dress, our bodice is extended to the very the hips line, that’s how this prom dress (I already told how to sew this elegant dress in this master class).
As you can see, the same bodice pattern will allow we will sew a lot of different dresses and please our baby a new thing sewn by my mother’s hands.
We have already sewed several one-piece dresses, and now Having mastered the method of building a bodice, we will also build a bunch of detachable model.
We make a bodice pattern for a children’s dress.
Well … it’s time to get down to business and create this pattern classic bodice for a children’s dress. Especially for mommies I created a simplified way to create a bodice pattern.
Contents
Take measurements.
To build a pattern, we need to remove the following measurements (Fig. 1):

We get each measurement by hugging the baby with a centimeter
Measure T – at waist level,
Measure B – at hip level (the most prominent part of the priests)
Merka G – at chest level (under the armpits),
Measure Sh – at the base of the neck (measuring tape passes at the very bottom of the neck – it lies at the base of the neck as there would be a string of beads if it was exactly right next to the neck baby).
I titled these measurements of girths with the initial letters B, T, D, W (hips, waist, chest, neck). For all calculations, we do not need full sizes of these girths – but only half – half-coverage or how do I called half-measure – half of the hips, half waist, etc. THEREFORE EVERY GRAVE WE IMMEDIATELY DIVIDE ON 2 – AND WE RECEIVE SEMI-SCOPE.
Measurements of the back:
Measure C – the length of the back from the cervical protruding vertebra, to the twine tied at the waist of the baby (required don’t be too lazy to tie a string just like that you will most likely find waist level on the usually-pot-bellied tummy of the child) – this measurement You don’t need to divide in half (it’s not a girth) – we write it in full value, not half.
Measure L – the width of the back at the level of the shoulder blades, measured from one free-hanging hand to the other.
Why this way
you will draw a pattern in 10 minutes
We will draw a pattern very quickly and simply – because …
1.) the whole pattern is inside the rectangle
2.) the bodice pattern consists of five lines – the neckline, the line shoulders, armhole, waistline, hips line
That is, we draw a rectangle, then inside it draw 5 lines – and you’re done. 10 min of work and we have a pro -essional pattern A bodice that fits all dresses.
So let’s get started.
We draw a pattern.
Draw a rectangle inside which we draw our pattern.
Rectangle height – measure С + half measure C is the distance from the neck line to the hips (you can remember for the future, that the distance from the cervical vertebra to the hips a person is always equal to 1.5 measurements of the back – that is, the measurement of C + half measurements C)
The width of the rectangle – half measure G + 3 cm – then there is a half girth with an extra 3 cm for free fitting (so that the dress does not stick into the body)

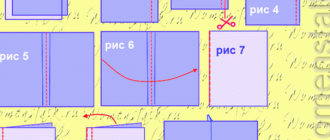
So, inside the resulting rectangle (Fig. 2) we and draw the whole pattern of the bodice – from the shoulders to the hips. We will draw a pattern very fast and simple – it just consists of five lines – hips line, waist line, neckline, shoulder line, armhole line – and that’s it.
We already have a line of hips – this is the bottom side of the rectangle.
The waist line is easy to find – you need from the top rectangle measure down our measure C – (that is, the length of the back from cervical vertebra to the waist) measure this distance on both to the sides of the rectangle and draw a horizontal line) – Figure 3 – so we found our waistline.
Find the edges of the neck
Find the middle vertical axis of the pattern – that is, the width divide the rectangle in half and divide in the middle of the vertical a line is the center of the entire pattern and the center of our future neck (Fig. 4).
Now on both sides of the line we postpone the classic neck width. It is calculated as follows:
Divide the half-circumference of the neck by 3 + 0.5 cm. The resulting distance is postponed to the right and left of the centerline – Figure 5.- and mark this distance with dots. Here we have found the width of the classic neck.

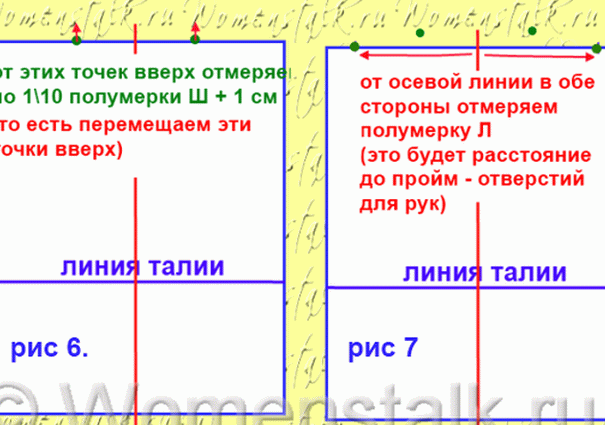
But the points of the edges of the neck should be located a little higher – we them slightly lift up – for this from the points measure up 1 \ 10 neck half-grip + 1 cm – and this the distance we raise the points (Fig. 6).
Draw the shoulder lines
Now from the same central point (from which we measured in both sides of the neck) we will measure in both directions the extreme borders of the shoulders – it’s easy – we measure on both sides by half a measure L. Received points are the extreme borders of the shoulders of our pattern (Fig. 7).
Now we recall that people have different types of shoulders – sloping, tall and normal.
From the point of the extreme borders of the shoulders, lay down the distance 2.5 cm for normal shoulders (1.5 cm for high shoulders or 3.5 cm for sloping shoulders) – fig. ten.

Hooray – the trickiest is already behind, now to draw sloping shoulder line, you just need to connect the high point the edges of the neck and the lowest point on the shoulder line (Figure 11). And here we are drew a line of shoulders.
And do not be afraid that these shoulder lines on the pattern turned out so much sloping, that’s right, that’s right. Lines the shoulders on the pattern are always tilted more than natural shoulders of a child. Do not think: “Oh, some kind of strong slope it turned out, my girl doesn’t have such sloping shoulders as here on the pattern, something here the author of the article was wise. “All ok, a sewn product with such inclined shoulders is perfect match your child’s shoulders when you put on it tailored dress.
Draw a neckline
Now we will draw the neckline at the BACK and at the FRONT.
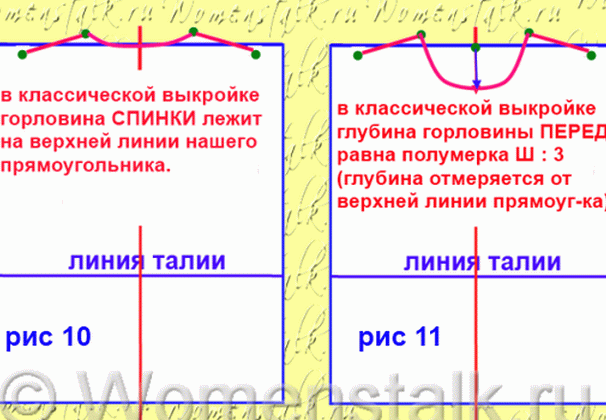
Neckline in a classic pattern lies on the top line of our rectangle (pic ten).
And the classic neckline deepens down the central axis is almost the same distance as the right \ left of central axis (Fig. 11).
That is, the depth of the neck (classic) calculated according to the same formula: half measure Ш divided by 3 (i.e. equal to 1/3 of the neck circumference)
So that the neck is drawn symmetrically, you can first draw the right side of the neck, then fold the pattern vertically in half, just along our center line – and to the left mirror our right side of the neck (through a carbon paper or piercing pin hole)
Find the chest line
We need to find the chest line in order to draw the armholes for hands. Because armholes end on the line breasts. Without this breast line we won’t know where to we need to draw these armholes – will there be a hole for hands of sufficient size or armhole will dig into the armpit a child. Therefore, we find the chest line – and then we can be sure that armhole lines will be perfect for our hands a child.
That is, the level of the chest line is the height of our future armhole.
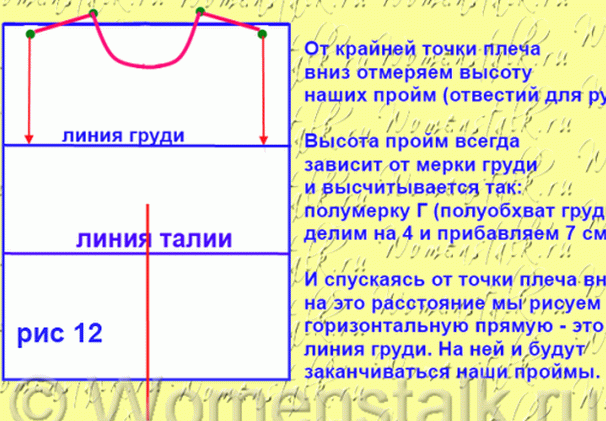
The chest line (it is the height of the armhole) is always calculated from the measurement half-circumference of the chest – Half-circumference of the chest is divided by 4 and add 7 cm. We measure the obtained distance down from extreme point of the shoulder (Fig. 12).
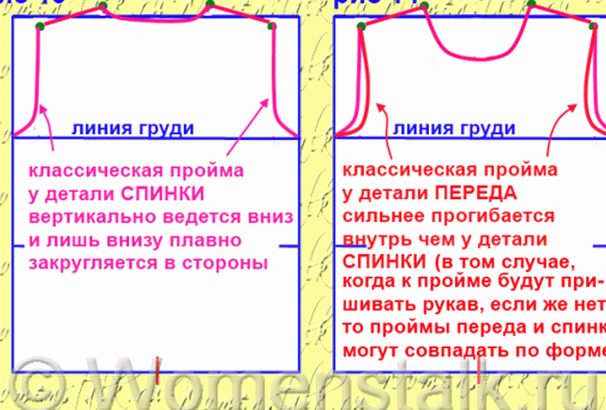
Draw the armhole line.
All now we can safely draw an armhole line (openings for the hands) – from the shoulder down and smoothly round to the side side of the rectangle along the chest line (Fig. 13).
I make a rounding to the armpit by hand and by eye. If you not sure that you draw correctly, you can follow this this rounding rule armhole: smooth rounding start at a distance of 2/3 of the height of the armhole – that is, 2/3 of the height of the armhole goes simply down vertically, and not reaching 1 \ 3 to the line of the chest begins its smooth curve to the armpit.
In the FRONT part, the armhole usually bends more toward the central axis (Fig. 14). But if the dress model is sleeveless, then the armholes the front and backs can be the same in shape (just vertically down and rounding to the armpit).
To armholes draw the same on the left and on the right you can do this: first draw a line right armhole, then fold the pattern vertically in half (by center line) – and to the left mirror our right armhole line (through carbon paper or piercing a hole with a pin).
Draw the side lines + round the line hips
Here the patterns are almost ready – or rather, it is ready for those moms whose girls eat well and they don’t have a waist yet. In your in this case, the dress does not need to be fitted – it will be under the armhole line line in a straight line (i.e. match the sides our rectangle) – Fig. 15. And to be honest, all the girls before 5-6 years old do not have a waist and have a round belly – this is the norm for physiology. Therefore, the lateral lines on the bodice for an age such as the rule is always straightforward and not fitted.
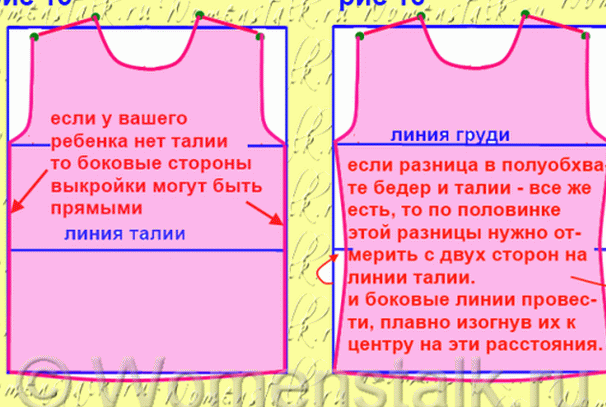
If your child has a significant difference between the measurements hips and waist – we now reflect this difference on our pattern – Fig. 16.
For example, suppose the hips half-circumference is 70 cm and half-waist 62 cm – i.e. the difference between these values is 8 cm. Then the waistline should be shorter by 8 cm than the line of the hips on our pattern.
And in theory, we would need to remove from the sides 4 cm to the right and 4 to the left – but here we recall the freedom of fitting and remove not 4, but only 3-2 cm – and you get a small waist bend, so just for beauty.
And if your girl is already over 10 years old and has curly forms with waist bends or she already has a chest welcome to my other article on building patterns with all chest and waist tucks.
Now we must still remember to draw the bottom line patterns – on the straight horizontal – and slightly round off – that is, down from the centerline – measured 0.5 cm and had a smooth roundness to both corners of the rectangle.
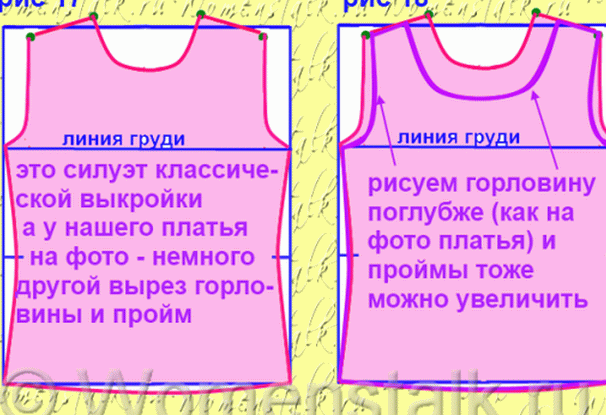
So, we made just a classic pattern with you (pic. 17) – it is CLASSICAL, because the outlines of its neck and classic armholes (neck directly under the neck of the child), armholes exactly on the handle of the child.
And now from this classic bodice pattern, every new time we We will receive a new and new bodice for the dress.
Each time for each new dress we will take this ready bodice pattern and slightly modifying it to get a new bodice pattern just under the dress. All we are going to change is cutout the neckline, armhole for the arms, and the length of the bodice itself (to the waist, higher or below the waist) – and every time we will receive a new model dresses with a new interesting bodice. Here’s how, for example, in the picture below-
With this bodice pattern, you can now sew this purple dress with tulle
Or this one with pink sequins and a bow – here I am in detail She told how to sew this delicate dress for a tender girl.
You can find several articles on tailoring one-piece dresses. here.
And also we have a cycle for sewing New Year’s dresses for girls.
Good luck with your tailoring.
Olga Klishevskaya, specially for the site “Women’s Talk”.