Good afternoon, dear self-taught seamstresses. Today we are finishing learn to work with silk. We already know from the first and second parts articles:
- how to prepare fabric for cutting (so that it doesn’t village)
- how to wash silk (so as not to “weld” it, and so that it is not strong hesitated)
- how to iron (so that he does not go in waves and does not bubbled up)
- how to cut from silk (so that the fabric does not slip),
- what threads and needles do not spoil silk,
- how to make a line so that the seams creep less
- how to grind parts from silk so that they do not slip alone otnostilno another and did not give a tightening.
And today, the third article on silk will tell:
- what seams to grind transparent and opaque silk,
- how to handle the neck and armholes,
- how to properly process the bottom of the silk product in order to preserve flow or vice versa flat surface, how to process the bottom corrugated folds.
- how to process cut edges if there is no overlock
- how to remove stains – especially those resistant to silk FAT spots.
Contents
Types of seams for silk.
If the silk fabric does not shine through:
Everything is simple here:
Conventional stitch seam – we use it in silk products from opaque fabric (any cut).
And also in the case when the product is supposed to be planted on the lining case.
Regular stitch – but with the smallest size stitch – so that the silk fabric does not have the opportunity creep on the seam.
If the fabric shines through, then treat the seams. need to be very careful. Seams will be visible through the fabric, therefore seam allowances should be perfectly machined.
If there is an overlock, then practice on the patch and select the most accurate overlock seam on this fabric.
If there is no overlock, then:
- Seam allowance sections can be sewn with a zigzag stitch. in two passes (so that the zigzags layered on top of each other friend).
- Handle the slice manually – by twisting. Then there are scissors to trim the hem so that they are along the entire seam the same width of 1 cm. And then cut the edge of the cut with a thread, slightly twisting the edge itself with your fingers into the roll.
It will be easier to do if the needle helps to cut twist – for this you need to alternately stick a needle into the edge cut the roll, then into the inner fold of the roll with the needle should pick up no more than 2-3 threads of fabric. Yes it’s not fast, but in the evenings …. to the sounds of the TV … and now in 2-3 evenings All the seams on your dress will be perfect.
- Apply special stitches (French or sewing), in which the edges of the seam allowances hiding inside the seam itself. Only these seams cannot be made on rounded embossed lines (such as sleeves or silhouette princesses. “That is, they are suitable for sewing straight edges parts, or with a very small (almost invisible) bend.
French seam (consists of 2 seams).
Put the parts on top of each other inside out (Fig. 1), evenly cut to cut (if somewhere the cuts are not coincide, crooked – trim with scissors). If the seam allowance was 1 cm, then backtracking 0.5 cm (i.e. half the allowance) from the cut make a line (Fig. 2).
Now we need to slightly reduce the allowance so that it is no longer 5 mm, 3 mm – cut the edges of the allowances along the entire seam length with scissors (fig 3).
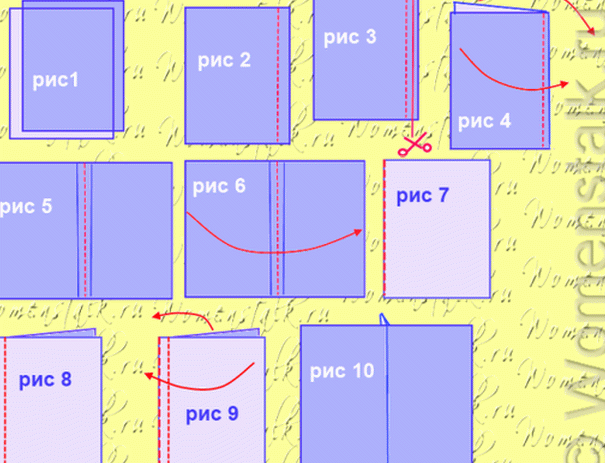
Now we unfold our did as a “little book” (Fig. 4) and iron the flaps of the allowances (Fig. 5).
Now we fold our parts with the front sides inside (that is, close the “booklet” so that the allowances remained inside the “pages”), and the fold line fell exactly along the first seam (Fig. 6, 7).
And we sew a seam along the planned line (Fig.  – (in our case, on 0.5 cm from the first seam). So our slices remained inside – sewn on both sides with stitches. Expand adjustments (Fig. 9) and we see that on the front side, too, everything is beautiful (pic 10)
This seam looks very neat.
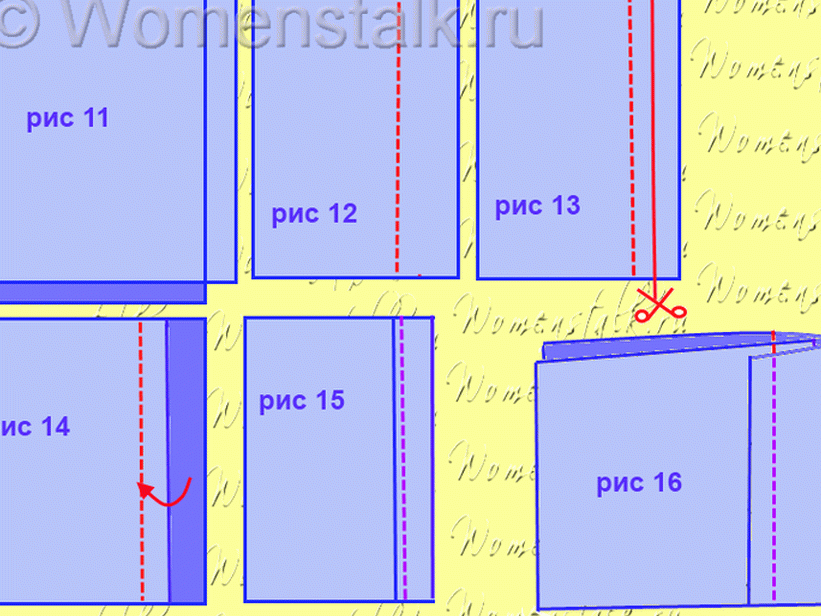
Sewing (fast) seam.
We put the details on top of each other inward (Fig. 11) and grind along the outlined seam line (Fig. 12).
We allow one-way allowances. One allowance (i.e. one sash) cut close (3 mm) to the line (Fig. 13, 14), and the second we twist the allowance and impose on the first one, which is trimmed (rice 15). We sweep it to hold, put it under the paw of the car and scribbling next to the same seam (Fig. 16). Such a seam do quickly and on the front side only one line is visible.
How to process the bottom of silk products.
There are several ways. Some of them aim to save creasing (in lush hem). Others are used to so that the bottom does not let the dress flow, so that the surface of the hem is as flat as possible (silk pencil skirts, tight-fitting dresses silhouette).
This pattern can be reflected in one phrase: than the wider the skirt (or tunic), the thinner the hem should be.

In any case, no matter how you bend the silk product – before he should be allowed to hang by this procedure – at least day.
The following types of bottom processing are available:
Processing oblique piping. This method is used sometimes when sewing from thin transparent fabrics, in in case it is provided by design. So compacted the hem of the hem is less plastic, it restrains the flow, gives him rounded smoothness. More on how to make and how to sew a slanting inlay – I already told here. Also this method used when sewing skirts pleated from thin tissues. So that the folds do not lose their shape at the bottom of the hem, bottom reinforce the edging cut from the same fabric.
Zigzag stitch hem. Product edges are ironed on the wrong side and are folded down along the fold frequent zigzag stitch. Cut off the excess piece of allowance with scissors as close to stitches as possible.
By the way, if the fabric is very transparent and airy, then for such monofilament is better for processing (it looks like a thin fishing line). It will invisibly process your edge and will not look rough, like It would be with ordinary threads.
Narrow hem to maintain flow. They are comfortable to process the edges of wide skirts or tunics. Need to bend the edges on seamy side and sew with a regular seam, backing 3 mm from fold lines.
Remove excess hem with scissors as close to the stitch as possible.
Fold this edge again to the wrong side, and again stitch along this same line. Iron the seam with an iron.
A hem with a twist for loose fabric. For this method, you need a special twisting foot, such which handkerchiefs are bending. If the fabric is very loose, then this the method is just good. But if you don’t have such a foot, then try do something similar manually – I’m already in the same article above described the method of manual twisting when processing seams.
How to handle the neck and armholes and loops
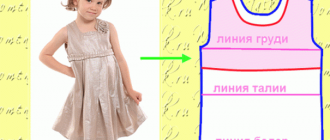
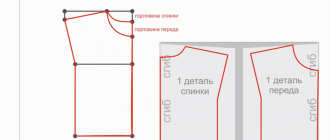
- For transparent silk products it is recommended to process edging (middle model in the photo below), then all the seams hide inside the edging and do not shine through transparent the cloth.
- The neck and armholes of the ruffle can be edged (see the first model on photo below)
- do the spinning processing (also good for transparent fabrics)
- monofilament zigzag stitch (she transparent as fishing line) – and then hide the finished seam by bending him to the wrong side and stitching around the edge.
- Make the treatment a weld seam (this is when the “dubbing” of the same material is sewn on the wrong side, repeating the outline of the neck – and all the seams are hidden between duplicating fabric and upper (this method processed the 3rd top on a photo)
So that the neck retains its shape before bending it or edging, it is necessary to lay along its edge one stabilizing line. Or if it is opaque silk. It can be glued before processing with a strip of transparent non-woven.

Buttonhole processing. Before need to cut the weld loop processing to this place glue with a small piece of transparent non-woven. Then scribble the loop, then cut it with a razor or the hole in the loop itself is very good – he is very good at this. AND at the end we remove the remnants of non-woven.

In general, for silk blouses with a button, it is most suitable a fastener fastener when loops and buttons are hidden behind a level.
How to hide nodules on a transparent fabric.
I’ll tell you by the example of tucks – tucks on transparent fabric. After we sewed a tuck we we usually twist the threads into a knot and cut them off, leaving them sticking out 2 the tail of the thread (as we do when sewing from opaque tissues). With transparent fabrics this is not possible – the nodule will be visible through the fabric – it’s not beautiful. It’s better to do this: after finishing the line, raise the foot, and pulling the fabric, pull the thread from the needle and out Shuttle of sufficient length, trim at this distance. Next you can at the very tuck at the end of the line to tie these long the ends of the threads in a knot, but do not cut. And now, each in turn insert the end into the hand needle and raise the stitches manually a seam of a tuck by several centimeters. Then there, at the seam, make a small knot and dive inside with the needle tucks, we pass inside the tuck a few centimeters, we emerge anywhere and cut the thread at the level of the place where it comes out from inside the undercut. Thus, the tail of the thread remained inside the tuck and he is not visible. And it’s best to process on transparent fabrics monofilament tucks (it looks like a thin fishing line).
Well, here is all the knowledge you need to fearlessly take for sewing from delicate silky fabrics. Now you’re not scared buy even a very expensive silk – after all my tips you will be it is impossible to spoil it.
And so when you have in your hands ready-made what you have sewn silk product, all that will be needed is to follow the rules care. About washing and ironing, I spoke in detail in the first part articles (where we washed and ironed silk for cutting).
And here I will only mention what to do if silk appeared a stain or silk was worn from the sock.
How to remove a stain on silk.
So … SPOT !!!
How to wash it off?
If not into hot water,
not with powder
and you can’t rub it with your hands?
Especially if the stain is oily. It is known that oily stains on silk Do not wash. No soap. No washing powder.
THERE ARE ALTERNATIVE WAYS TESTED people and collected by me from various forums. Here they are:

Dishwashing liquid – experienced people they say that if you hold the tissue in such a solution for 2 hours, it will be removed even last year’s stain has passed more than one wash.
Try the Sprite drink – it also eats away stains, there are people who swear that they removed the fat from silk.
Champagne is also a good thing against stains. Here the successful tandem “alcohol + bubbles” is triggered. As known, Wipe the surface with alcohol to remove oil stains. BUT bubbles allow alcohol to penetrate between the fibers of silk. This I accidentally came up with a way – when I spilled it on a silk sheet with stained glass of champagne.
Gasoline – apply with a cotton swab to the stain, wash several times in cool water with shampoo.
Talc – well removes fresh spots. There are even special aerosols for dry cleaning with talcum powder and a brush on cap.
Urine – if you hold for half an hour, it happens that stain go away. A solution of ammonia in water also works. Only check if this affects the color of the product.
If the stain is not greasy – a stain of dirt, graphite pencil, etc. – you can rub with a cloth soaped in laundry soap (wonderful in In this regard, the soap “Antipyatin”) and then wash in shampoo, as usually.
And finally, if the stain is not removed – and the thing from silk is very dear to you – it can be repainted. Or special dyes – in the cold way (it is impossible to hot silk). Or if you like shades from light beige to dark brown – there is Manganese. Any light silk can be repainted with a simple dipping. in a cool solution of potassium permanganate – the darker you want the color, the make the solution stronger and dip more. After this fabric rinse is not necessary – have achieved the desired shade and hung to dry (mmm, that’s interesting, but if in tea … or onion peel … it will be spot, you have to try).
The silk blouse was worn – what to do.
Yes, that happens. You love her, wear almost every day and suddenly you notice that the delicate cloth has been worn. Usually on the shoulder, where is the bag hanging. On the thigh where the bag comes in contact with the fabric. At the belt where the belt injures her.
Really throw away ..?
No – we will save.
Option 1. Add cut elements.
- Drape the folds in this place
- Sew a shuttlecock, a flower cut out of lace, braid. Moreover, eclecticism is a combination of incongruous – Now in fashion.
- If the abrasion from the bag on the shoulder and hip is ideal hide and even give elegance flounce sleeves (see photo below). True, if the blouse already has sleeves – their will have to be cut off. And it’s okay if the flounce sleeves are different color. They can be supported by jewelry of the same shade, for example, a bracelet and earrings. How to make and sew yourself sleeve-flounces – I already spoke in detail in the article.

Option 2. Hidden application.
- If you have, for example, a floral blouse, you can close abrasion, cut-out on the contour of such a flower and close it scuffing gluing it as an application on a thin non-woven (double-sided glue web). A flower can be cut, sacrificing the bottom edge of the blouse, or shortening the sleeve, or the presence of a turn-down collar, cut it from the inside collar – there is not noticeable.
- Or scatter here and there sequins, they will cover up the scuff, where it is, and in other places attention will be drawn to itself.
In general, there are a lot of options – I won’t be surprised if, after modernization you will love your blouse even more.
That’s all I wanted to talk about working with the lungs and silky fabrics.
Good luck with your tailoring and socks!
Olga Klishevskaya, specially for the site “Women’s Talk”.