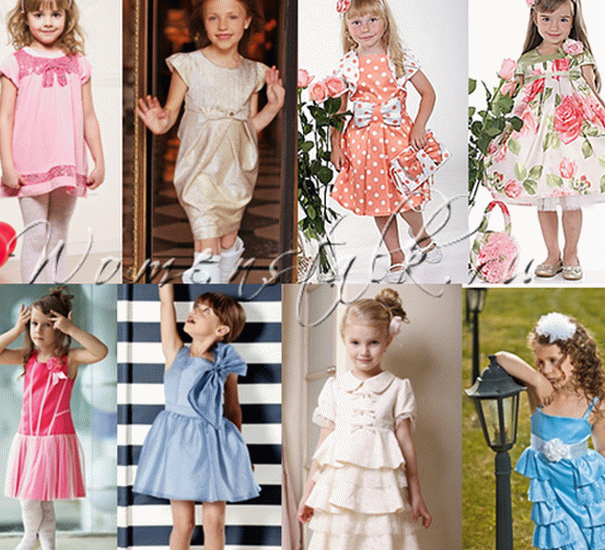
Hello, dear mothers and grandmothers are not very small girls. Graduation in kindergarten – these are children’s elegant dresses. Spring has come into its own – and you probably already look at dresses for girls on the expanses of Runet, sniff at prices for ready-made children’s dresses in stores. Therefore, I am starting a new cycle of articles, master classes on how to sew a graduation gown for yourself.
Our first workshop on children’s dresses on I’ll start graduation with a description of such a simple but very pretty, modelki.
There will be a lot of articles, children’s dress for graduation you You can choose to your taste and sew it yourself. Yes, my own hands. And it’s not scary if so far the most big of your exploits in the sewing field is sewn button to the shirt of her husband.
You can distinguish a thread from a needle, you know how to read – it means you sew dress according to any of our lessons. Moreover, I’ll tell I will show everything in detailed step-by-step pictures and, honestly, not I will overload your head tired of working days – no abstruse tailor’s terms. I will explain everything to a living human speech. You yourself will be surprised to what dresses are simply sewn for girls.
I will do several workshops on sewing children’s dresses on high school graduation. Here are some of those that we are together sew.
And there is nothing terrible or difficult here. They only seem so complicated – but actually – 2-3 pm and you have hands a new dress – this is for beginners. And when you get the hang of it and you’ll do the dress for the evening. It’s so nice to pamper your daughter a new dress.
For this graduation cycle, I specifically chose modelki not magnificent dresses with crinoline. If you sew a baby dress yourself, the one that you can then dress for any other holiday and even for a walk in an amusement park or on a visit. For ballroom dresses I will write a separate cycle of master classes.
For those who found our site for the first time – I’m glad to announce that we already have there is a series of articles on tailoring simple children’s dresses. And today we are already starting to sew Fancy dresses for girls.
Well, now the master class on sewing the first children’s dresses for graduation. I will tell everything in detail from the pattern to roses at the golovin.
Contents
Creating a pattern of children’s dresses on high school graduation.
If you are not the first day with us then you have already done a pattern for the lesson from the article Children’s dresses to sew yourself – quick and easy. Part 1. There I described in detail how myself without complex and painstaking calculations and drawings for 1.5-2 hours to make a standard pattern-template (based on of this pattern, and all possible models of subsequent dresses).
If you have a template (who does not, do it in 30 minutes), then for To create a pattern for this dress, we need to do the following.
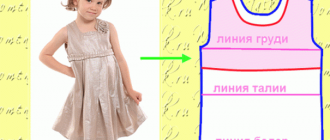
Graduation dress for children – make changes to pattern-template.
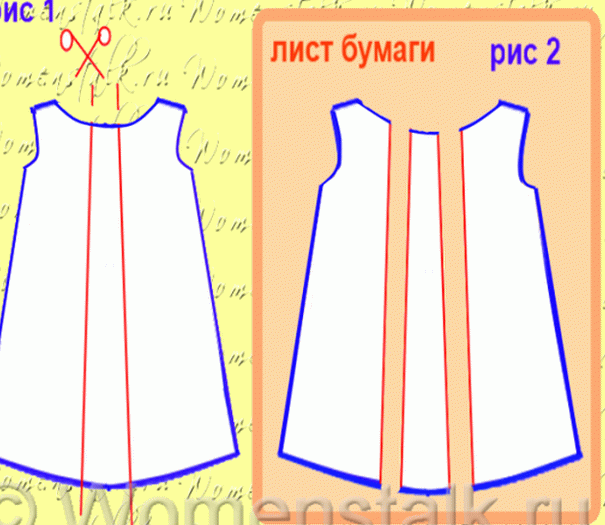
We take a pattern-template. But not the only one you have – we will cut it now, that is, a subport. Therefore you are better make a copy of the pattern-template (circle it on a sheet of paper or wallpaper), so that it would not be a pity to spend with her all the following manipulation. Moreover, at one of the stages we need non-modifying (i.e. unchanged) pattern-pattern. In this way, you should have 2 patterns on your hands – one we will cut (and this will be the pattern in front of the dress), the second will remain whole (and it will be a pattern of the back).
We find the middle of the neck on the pattern-template. Retreat from midpoints 3-6 cm to the right (draw a mark) and to the left (also mark pencil). I wrote “3-6 cm” because if you sew a dress for a little girl, the indentation will be small (on a tiny the pattern doesn’t reach well), and if you have a large girl sizes then the indentation will be larger. Now draw on these marks down straight lines – you can strictly vertical, you can lines that slightly apart from each other.
Drawn, now we cut our pattern along these lines template.
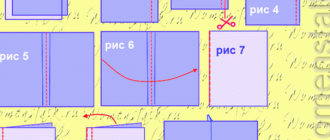
Cut, now we take a new sheet of paper and lay on it our pieces of the pattern, leaving a distance of 5-10 cm between them (rice 2). The more distance you choose, the deeper our folds at the neck.
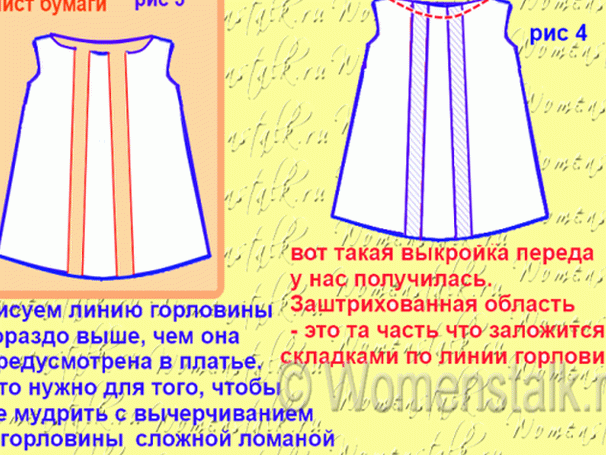
We circle all three pieces of the pattern on this sheet. We remove them with sheet (so as not to interfere) and now you need from these drawn pieces combine in one silhouette. Draw down the hem smooth slightly rounded line (the height of roundness of this line does not must exceed 1 cm).
We do the same thing along the line of the neck – but for the time being we are the neck draw higher than it should be. This stock at the top we need for fearless wrinkling. Running forward, calm down – then when we do the creases, we are superfluous cut off.
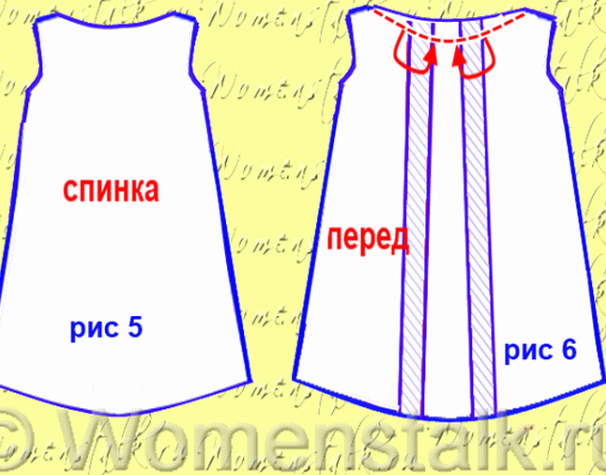
Thus we got a pattern of the front (Fig. 6). Pattern backs can also be like this (with pinches). Or the back may be cut unchanged pattern-template. As you please – and so, and it will turn out beautifully. In Figure 6 we showed red arrows how the pinches will form – we just lay the lines one to the other at the top of the pattern.
Open a children’s dress for graduation.
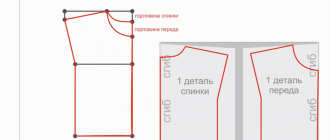
Now we put the front and back patterns on the fabric, circle small (if there were no allowances for seams in the pattern template, then we do them now with a shallow outline). Circled and cut back details and before.
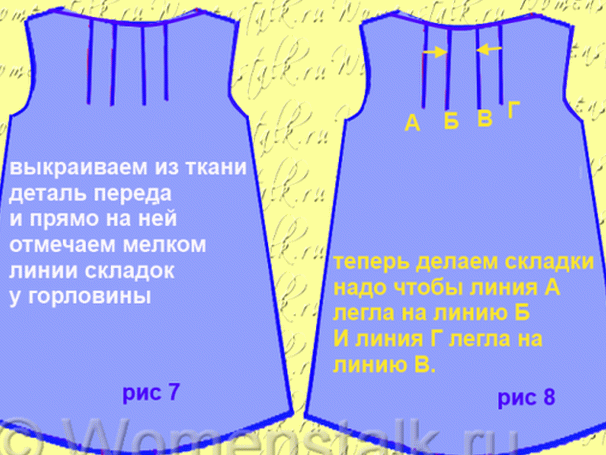
Right on the front of the dress, draw the same lines as on pattern (we draw not along the entire length but only in the upper part) – rice 7.
Now we will form folds (as in Fig. 8). Line And we put on line B and fix the thread with needle (fixation is done only on the upper (2-3 cm) segment creases – because below the crease expands freely (as seen in the photo of the dress and in Fig. 9). In the same way we make the second fold – line G we put on line B and fix.
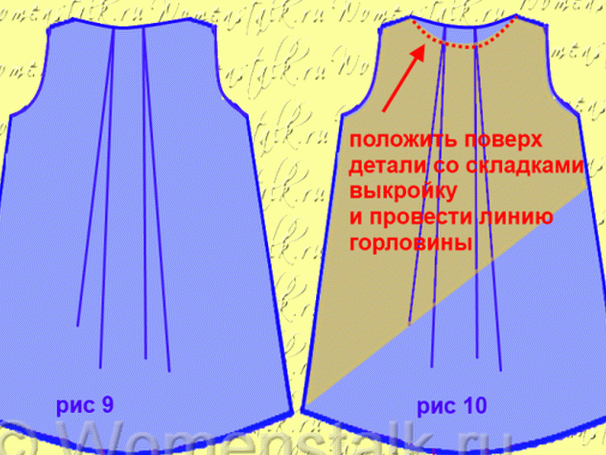
Now that the folds are done, we will return the neck previous outlines (remember, we overestimated it). For this we we put the usual pattern-template on our dress – shoulder to shoulder – and draw a circle directly over the fabric – draw the right line the neck.
It remains only to cut off the unnecessary along the line with scissors – BUT MAKE SURE that the crease fixation line runs below of this new neckline — that is, make sure that when trimming our folds will not part. If necessary, lock folds with extra stitches below this freshly drawn lines.
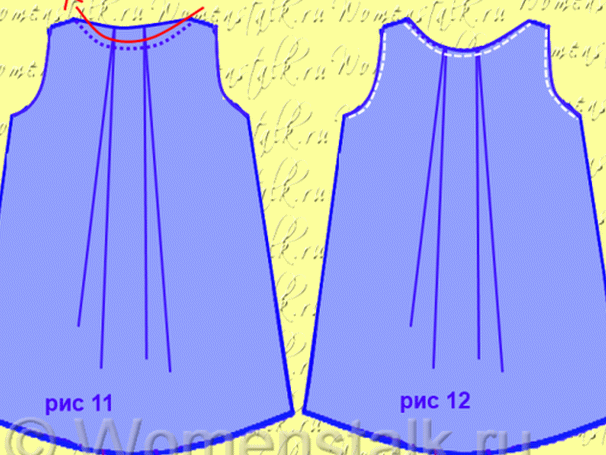
So, after the neckline is cut off, you can immediately process the neckline (Fig. 12) (you can process the neck later when the back and front parts are stitched).
We process this way – bend the edge in 0.5 cm and sew. If there is an overlock, then overlock, then bend and sew. At I do not have an overlock, I process the edge manually, or I can bend 2 times (unless, of course, the fabric is not very thick).
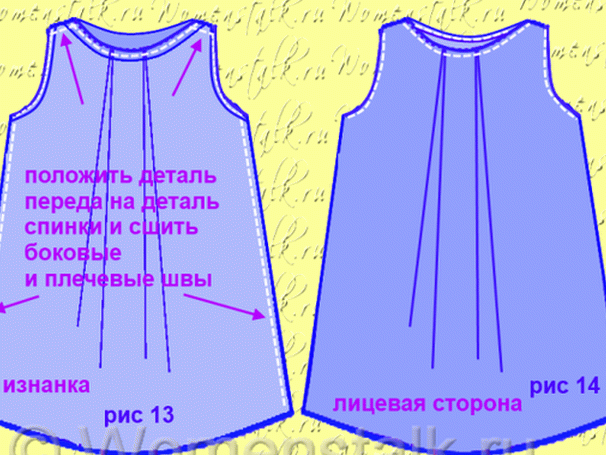
Now we will sew the details of the front and back our children’s graduation gown. Let me remind you that you can back cut as extended with the same folds (the same pattern as that of before), and the usual straight line (according to the pattern-pattern).
We attach the back part to the front part with the front sides inside. And we sew the shoulder and side seams (Fig. 13). We process armholes (openings for hands) and the neck (if you are on processed yet, at the stage of individual parts of the back and front).
We process the hem bottom – overlock manually or on the overlock and bend 3-4 cm – fix the bend with the usual machine seam or manually with hidden stitches.
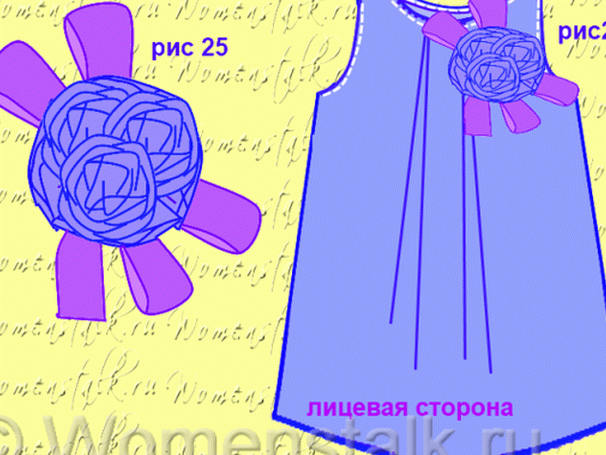
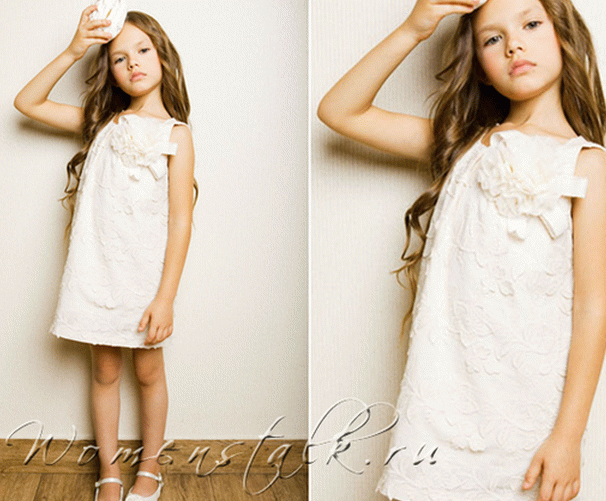
Here the dress is done – it remains to decorate it with a magnificent clove (as in the photo above). We will also produce cloves now – this is very simple and fast, and most importantly interesting. For this I wrote separate master class in pictures “Flowers made of fabric – just and fast. Part 1.”
And in the next lesson we will sew a prom dress with the top a tulle skirt.
Good luck with your tailoring.
Olga Klishevskaya, specially for the site “Women’s Talk”.