Hello dear mummies. Today we will sew again children’s dress based on a pattern-template, drawn by us in the first part of the article “Children’s dresses – sew it yourself quickly and simply. Part 1”.
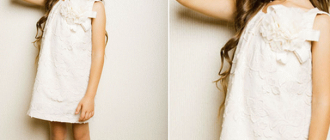
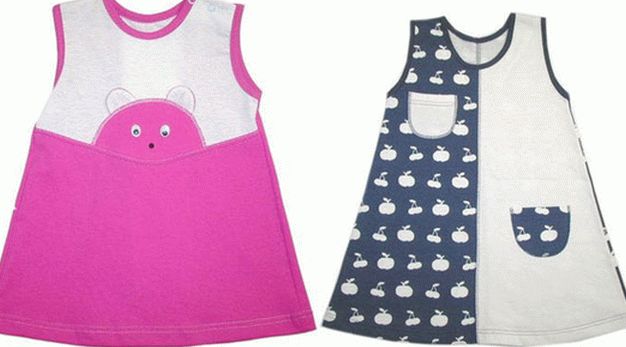
We will consider the option when, based on our a dress is made of pieces of different fabrics, such as, for example, these dresses:
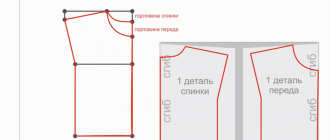
As in all dresses based on a pattern-template, we first make a copy from the template – put the template on the wallpaper sheet and circle around.
Now you can make notes on this new pattern, you can cut into pieces, which we are going to do. See picture below
So, Model 1. Dress “animal in ambush ”
We modify the pattern-template.
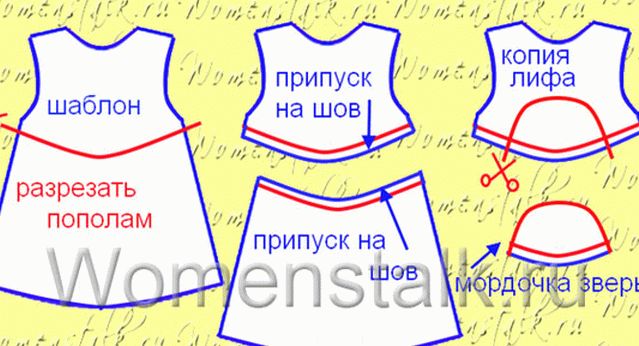
On the pattern, draw a line dividing the dress by 2 parts white and pink (you can use a curved line, you can direct – as you draw it will be). By the way, if you want to draw smooth curved line (and there is no compass in the house), just look for a round plate or dish, on the side edges of the pattern make notes, attach the dish close to these marks and circle around the edge of the dish with a pencil – you get a perfect round line.
On this line we cut the pattern into 2 parts, and mark the cut edge to add an allowance to the seam. That is, when you put the pattern on the fabric and will circle it, then add 2 on the cut line see Other seam allowances are not needed – we already did them when created this template – see “Children’s dresses – stitching yourself quickly and easily. Part 1”.
So we got the bodice pattern (the white part of the dress) and the hem (pink part). Now we need to make another copy of the bodice pattern (see. Fig. above) and on this copy draw the outline of the animal’s head and cut out. This is our third pattern.
Note about the clasp. If our pattern-pattern, the neck is wide enough and the head of the child passes freely in the dress, then the clasp (which we see in the photo in the beginning of the article – 2 buttons on the shoulder) is not needed, in fact. But if it is not so, then there are 2 solutions: either increase the neckline on the pattern, or provide a clasp for the dress. Learn more about how to do it. this (and not only this) fastener, read in our special article “Clasps for children’s clothing – do it yourself.” If a you do not like this clasp, you can insert any other of described in this article (for the first 3 fasteners from the article no changes to the pattern are required at all) – select which is easier for you.
We translate the pattern on the fabric and sew the details.
That’s it, now you can take the fabric, white and pink, and transfer our 3 patterns to it (do not forget to make sides of the cut allowance for the seam connecting the upper and lower parts dresses – the remaining allowances are already contained in the template itself). Back dresses may also contain the face of an animal or simply consist of two halves of white and pink.
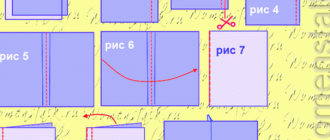
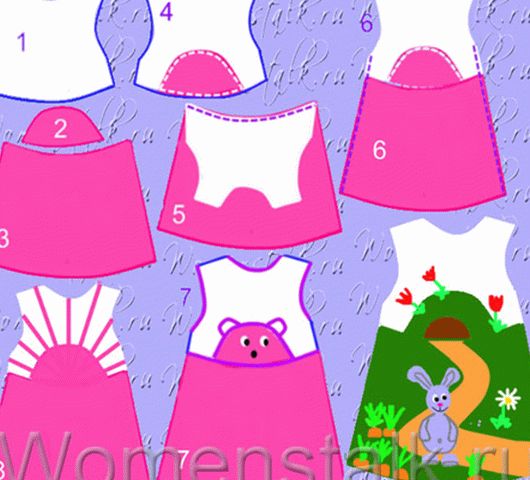
Details were cut from the fabric (Fig. 1, 2, 3). Right away put on our white bodice our pink face of the animal – place it is strictly centered and pinned with pins (so as not to shift), we sew manually with large stitches (Fig. 4). And now you can pull out the pins and sew on a typewriter (who does not have a typewriter go to the studio – in a couple of minutes and a little money will be made to you all seams).
Now connect the top and bottom of the front of the dress (Fig. 5), do the same with the back. Then finished back and before laying on top of each other inward and we sew the side and shoulder seams (Fig. 6)
Now the final chord is decoration (Fig. 7), we take a braid of pink (or another contrasting color) and hide our seams with this braid. From it we form the ears of the animal. To make it smoother, it’s better to first tap the braid manually (burn the ends of the tape with a lighter so that they do not open), and when everything will be smooth and beautiful, sew on a typewriter.
With the same braid, you can process the armholes and neck, or you can just bend the edges of the armhole in and stitch.
We make a nose and eyes to the animal, you can use ordinary buttons, or buy in the “button” department store special eyes for toys.
Everything, a children’s dress with your own hands – is ready.
Based on the same pattern, you can create other designer dresses. Let’s play a designer.
For example, I had the idea of ”dresses with sun “(Fig. 8). Rays must be sewn onto the bodice immediately – let the ribbon ribbons diverge from the center bottom bodice and in all directions like rays. Bend the tips of the beams behind the armholes and neckline. And then, on top of the rays, sew our semicircle (disk sun).
Or a more complex and painstaking application, where a semicircle turns into a mink of some animal, and then flowers-berries. I chose a hare and a carrot (Fig. 9) .How to do I’ll definitely tell and apply applications on fabric in one of them future articles.
If you want this dress to have a sleeve, then that’s it, what you need, you will find in the article “Sleeves for children clothes – do it yourself. ”
Good luck with your sewing! Write wishes comments and questions in the comments to the article there but you can post a photo of your dress (or dresses, which you would like to sew, but do not know how).
Olga Klishevskaya specifically for the site Women’s talk