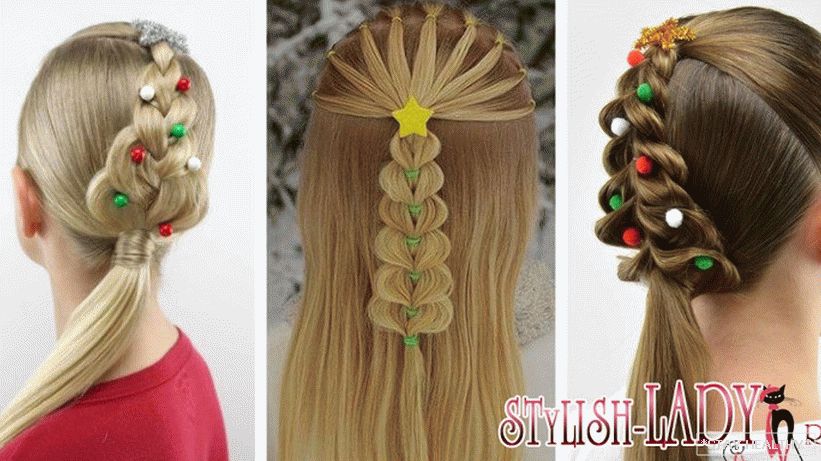
Hairstyle “Fir-tree”, as well as the New Year’s suit of the Christmas tree, never
goes out of fashion. Variations of weaving of original braids and
There are quite a lot of tails from which “Christmas trees” are made. Enough
master one technique, then to improve it.
While working on the hairstyle, the child should be comfortably seated and
something to do. If the little model keeps turning around
Neat Christmas tree does not work. If children’s hair is very confused
or push, during weaving, you can slightly moisten them with water from
sprayer or use a little tool to fix
hair.
You can choose a hairstyle, if desired, for a girl with any
длиной и густотой hair.
Contents
Ways of weaving Christmas trees
We offer you 4 variants of weaving, which you can repeat.
self at home.
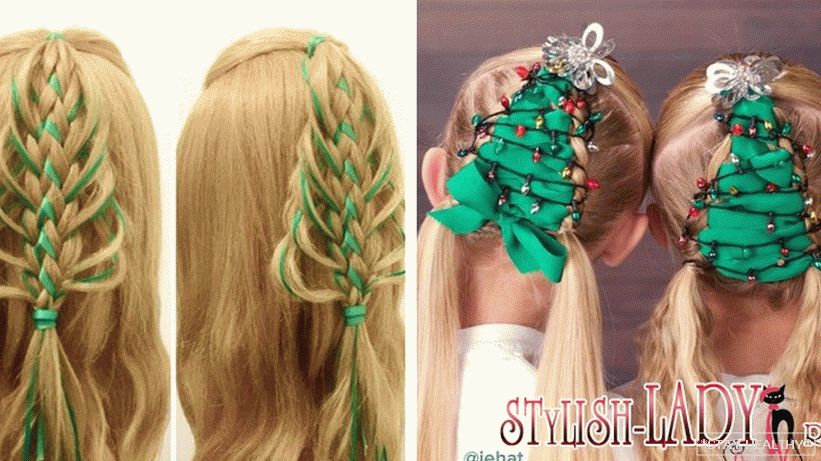
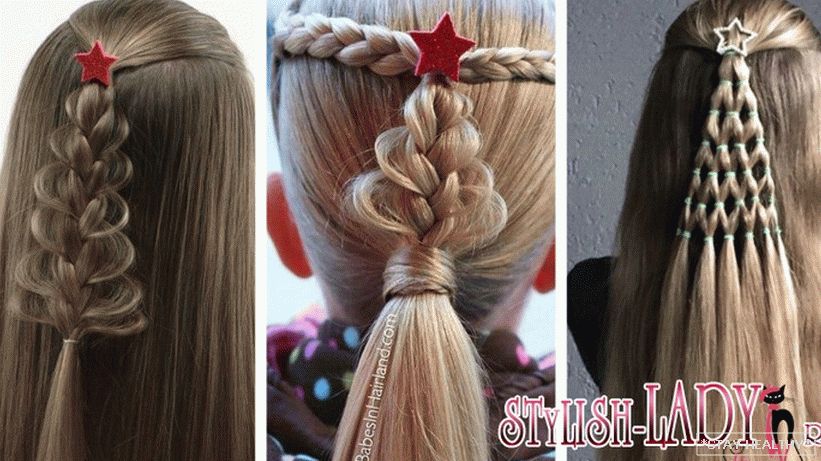
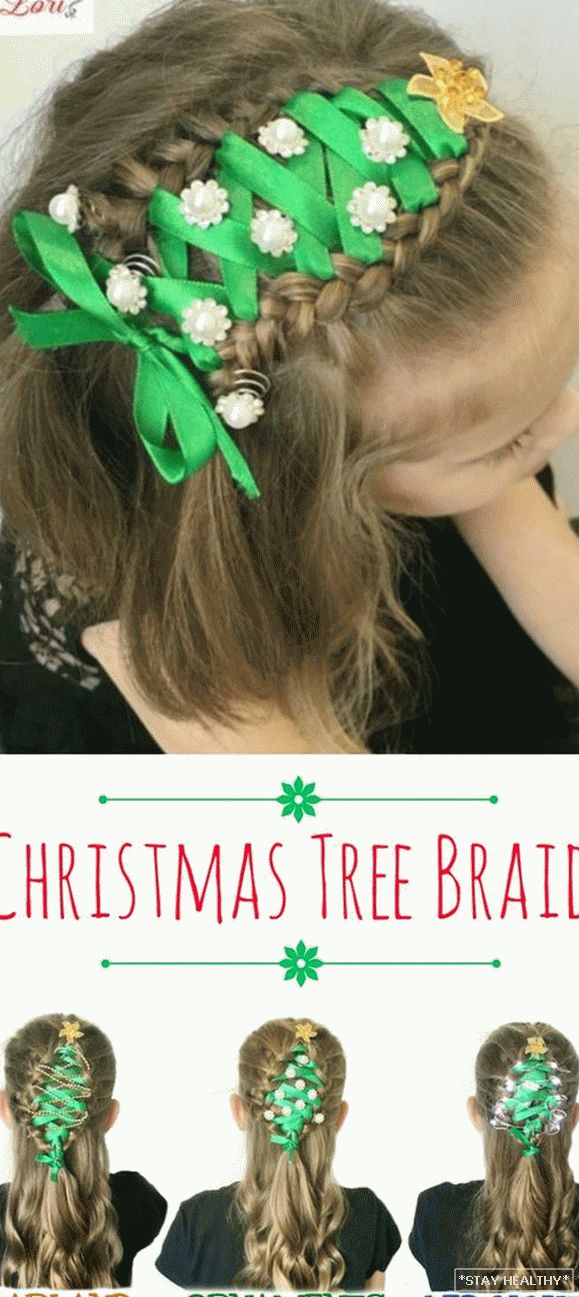
Two braids with lacing
The hairstyle will suit girls with long hair over their shoulders or
more.
To create it you will need:
- three dense transparent elastic bands;
- thin ribbon;
- comb with one sharp end (to form
partings); - fixing varnish;
- screw-in ornaments or hairpins and one small
asterisk for the top.
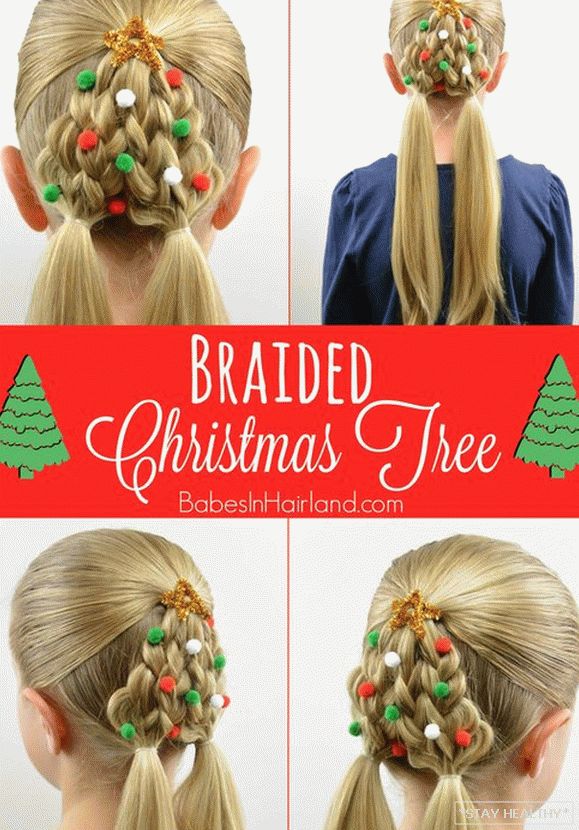
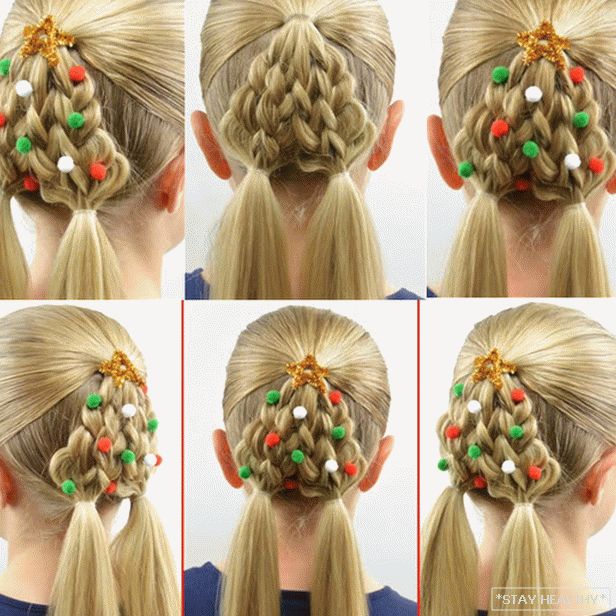
Weaving Christmas trees will not cause difficulties, if you strictly follow
step by step instructions:
- Carefully comb the hair, separating the area on the temples to
crown. - At the highest point of the crown, tie a still tail. It will be
the top of the Christmas tree. - The tail is divided into two equal parts. For convenience, stab one
barrette crab. - The second is divided into three parts and braid into a braid, making
one-sided pickup on the outside. - Tacks need to be adjusted so that they end up somewhere on
middle of the ear. And on the spit to make another five or six bindings.
Fix with an elastic band, even if there is enough hair left. - Do the same with the second part of the tail. As a result
should make two pigtails. It is important that they are located under
acute angle to each other. - In the first cover on both braids need to stretch the ribbon
so that its ends are the same on both sides. - Threading the ribbon through the braids, the space between them seems to be
lace up, forming a herringbone. It is necessary to control in order to
the bottom of the silhouette expanded, and in the place of fixing the braids with rubber bands he
must taper again, forming a trunk. - Of the two tails left from the braids to form one,
securing it with one rubber band. - Tie the remaining ribbon in a bow.
Finished Christmas tree left to decorate. For this crown
adorn the star, and twisted rhinestones, like balls, decorate
the whole tree. Hair tied to the bottom of the tree can be left as
eat or curl a little. In order not to harm children’s hair, it is better
do not use heated hair rollers or curling iron, but screw them on rags
or napkins. It remains to correct the loose strands and slightly
sprinkle with a finished hairstyle.
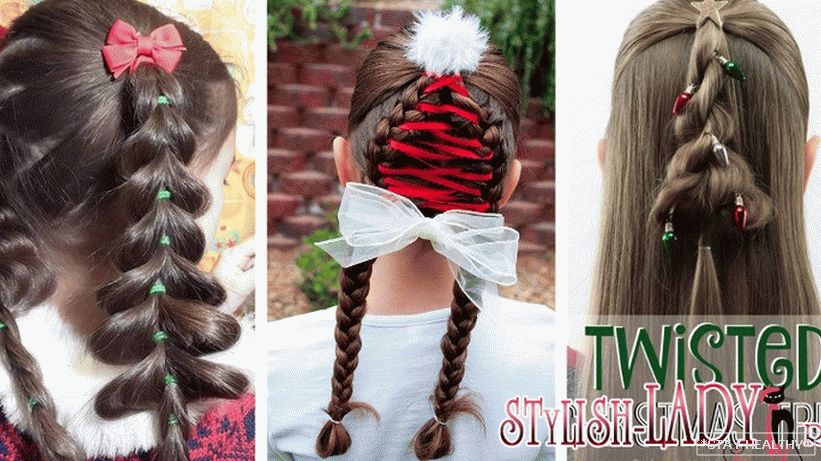
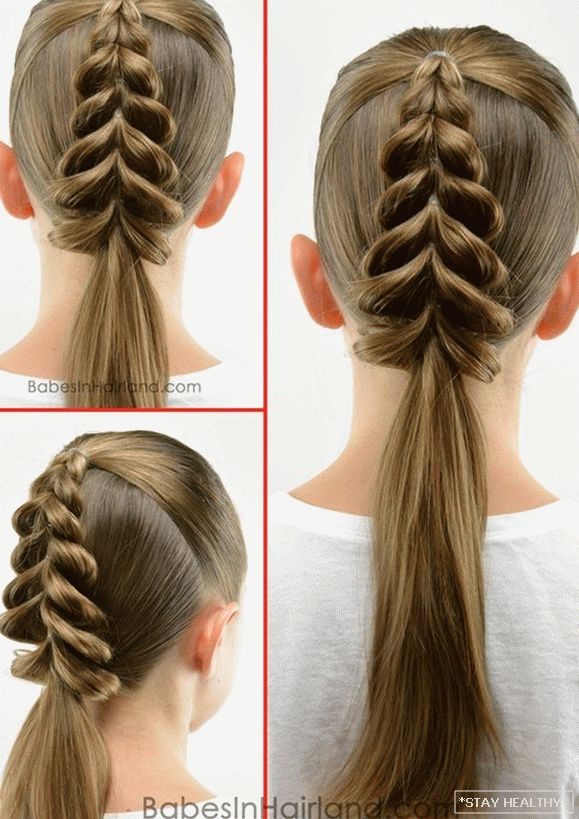
Herringbone tails
This hairstyle should be done on the hair length to the shoulder blades. But
if you try, on a shorter, such a Christmas tree is also possible
to do.
To create a new-year hairstyle from tails you will need:
- two elastic bands for fixing thick tails;
- eight to nine transparent rezinochek for thin tails;
- barrette for the top and various decorations on
stiletto heels; - spray with water;
- comb with a sharp end to separate the strands.
Form a hairstyle in several stages:
- Divide hair into two tails: one to tie at the back of the head,
the second is at the crown. If the hair is not too long lower tail
better to tie a little higher. - Upper tail split hairbrush horizontally into two
parts. - The resulting topmost tail vertically divided in half.
Two strands bypass the lower tail and reconnect them under the tail,
securing with a rubber band. At this time, the tail, which was in the middle,
move up and temporarily fasten the clip so that it does not
interfered. - Tail down, moisten hair and comb.
- Divide the tail into two parts horizontally and repeat all
actions are similar with the first tail. In the same way to do
some more similar elements. - Starting with the second pair of strands tied under the tail, you need them
slightly push the sides to give volume.
All stages are repeated until weaving reaches the second
big tail on the back of his head. It is wrapped in two strands, which
knotted under the big tail, and again split the tail. Eventually
should get the most voluminous and large side strands, as the bottom
twigs on the Christmas tree.
For decoration, you can use studs with balls at the end or
beads. Not the top of the Christmas tree can be placed as a clip
asterisks.
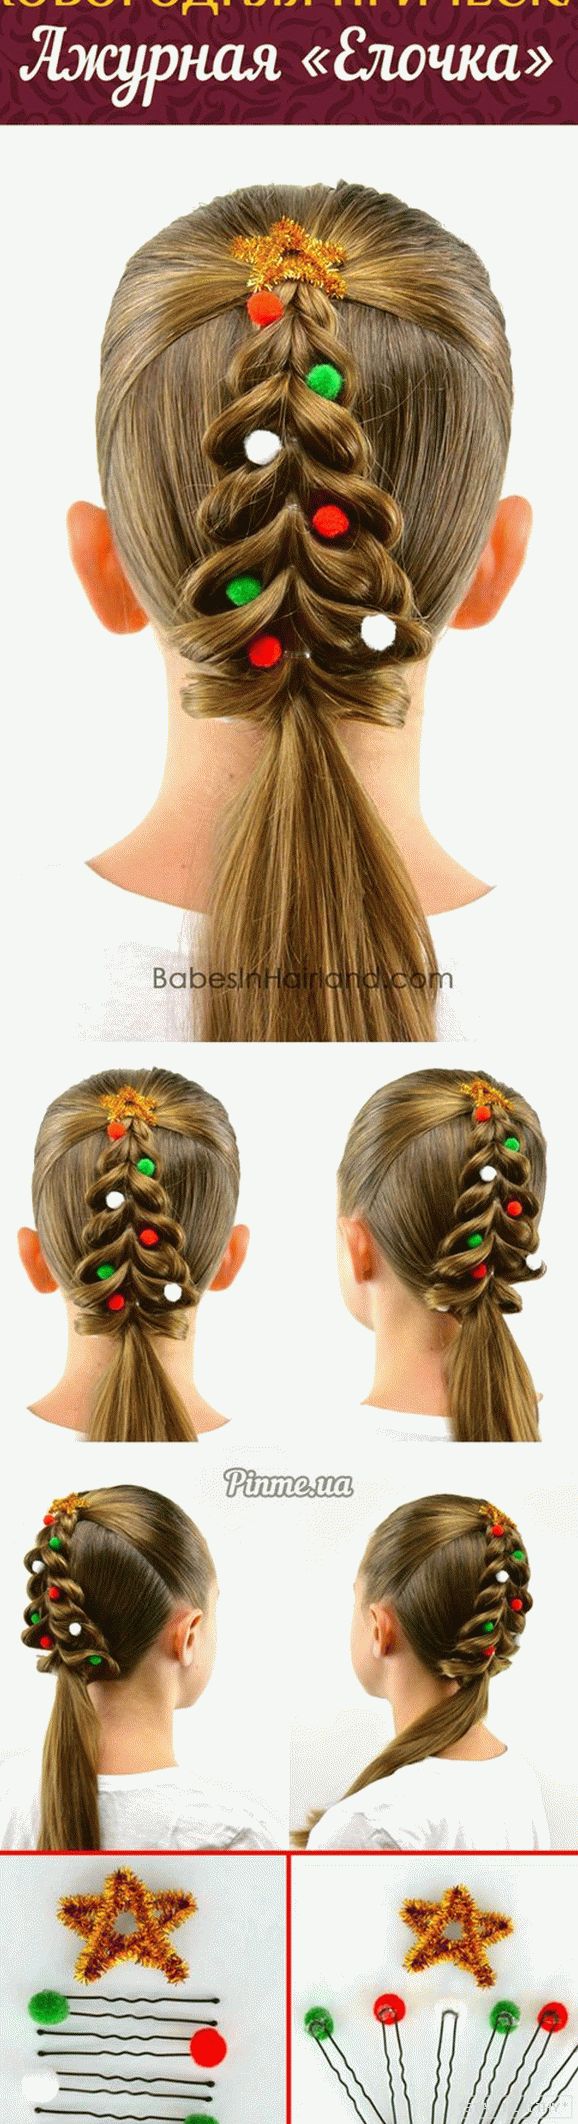
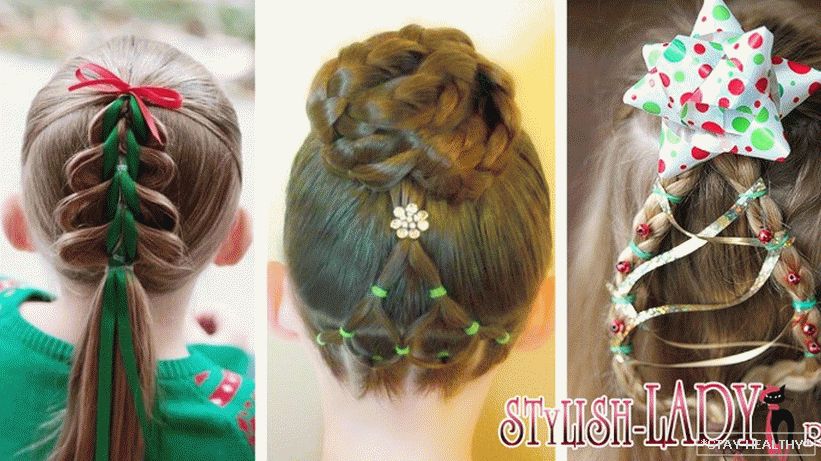
Of four braids
You can make a similar hairstyle on the hair of any length. To
Create a Christmas tree of four braids will need:
- gum;
- crab pins or other convenient clips;
- hairbrush for even parting;
- hair ornaments on hairpin.
The algorithm is simple:
- Hair carefully calculated and divided into three parts: the first
part to collect in the center of the crown in Malvinka; second and third
split in the middle. The second and third strands stab
crabs so they did not interfere. - Мальвинку разделить на четыре parts. One to separate, and the rest
pick up at the time with hairpins. - The selected strand to comb, moisten, so that the hairs do not
confused, braid the usual pigtail. At the same links on the one hand
(outside) a little push. Spit the braid to the neck and stab
with the remaining hair. - Weave a second pigtail from malvinki, pushing the links from both
parties. To stab - Ready pigtails lift up to make it easier to work with
hair remaining below. - On one side of the hair parting moisten, comb.
Lower the braids and tighten into one tail with loose hair. - In a similar way to make the second side of the Christmas tree: braid
two pigtails from malvinki, tie them in a tail along with hair with
the other side of the parting. - Spread the links of the braids to give the volume of the resulting
herringbone.
It remains to fix the loose strands, remove the cocks, comb
tails, decorate hair. For the decor, you can use a hairpin
in the form of asterisks and heels.
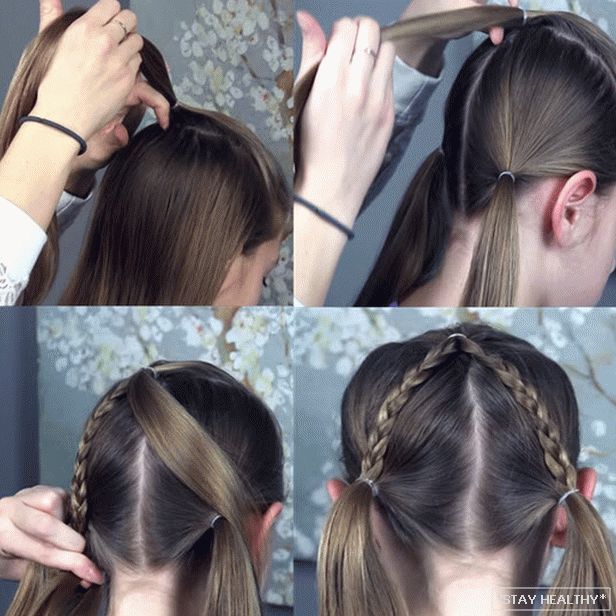
Of the two braids and tails
Weaving is not very difficult. For it you need to prepare:
- transparent elastics;
- lacing tape;
- decorations.
Weave herringbone as follows:
- Разделить волосы горизонтально на две parts. Spend in the area
temples side parting. - Tie tail on top.
- Остальные волосы разделить вертикальным пробором на две parts.
Tie on the sides, as close to the ears, two tails. AT
the result should be three tails creating between themselves
triangle. - ATерхний хвост разделить на две равные parts. Stab one
so as not to interfere. - From the second weave braid directed to one of the lower
tails. - To tie a rubber band tail, formed from the lower tail and
pigtails. - From the second part of the upper tail, braid a similar pigtail and
pick it up in the second ponytail. ATажно, чтобы обе косички
arranged symmetrically. - Slip the tape into the upper inner links of two at once
braids. - �”Lace” pigtails inside. In this case, you need to follow to
Ribbon stitches were smooth and slightly overlapped. ATнизу
tie a bow.
It remains to fix the pigtails, straighten the ribbon, decorate the Christmas tree
star and twisted rhinestones. Tails can curl or
leave natural.

Herringbone hair can not go unnoticed at any child
event. ATнимание со стороны окружающих даст возможность любой
little girl to feel like a princess at the ball.